How to route multiple ECS Cluster or Service and projects to a single ALB
If you want to route multiple ECS Cluster to a single ALB, you can easily set it up using AWS ECS DMS.
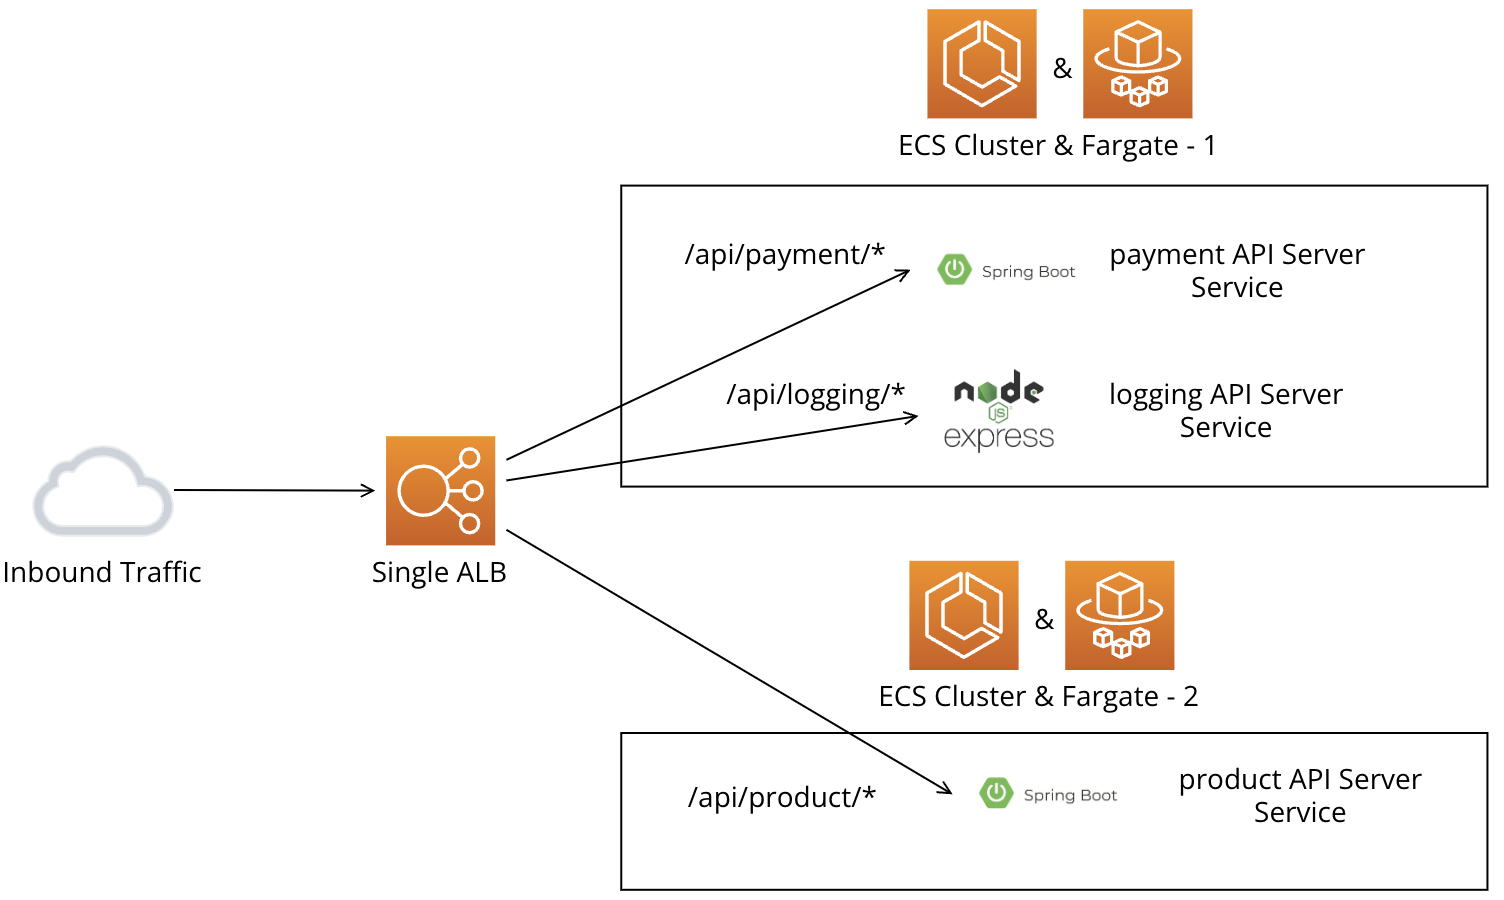
This image demonstrates an example where two services, a Spring Boot payment API server and an Express.js logging API server, are configured within one ECS cluster, while another ECS cluster hosts a single service for the Spring Boot API server. These services are then routed through a single ALB. Let's configure this directly through SWS.
- After clicking the link below to access the SWS console web, proceed to log in to the AWS Turn Key Console.
- Once you have accessed the AWS Turn Key Console, click on
AWS ECS DMS.
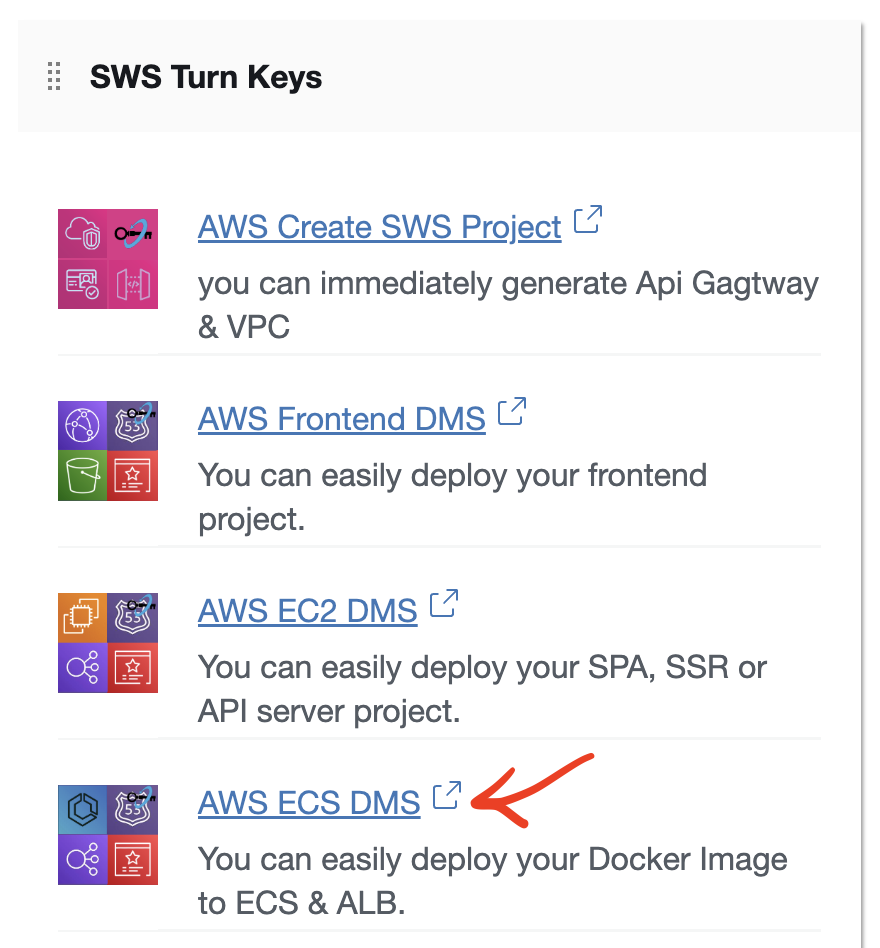
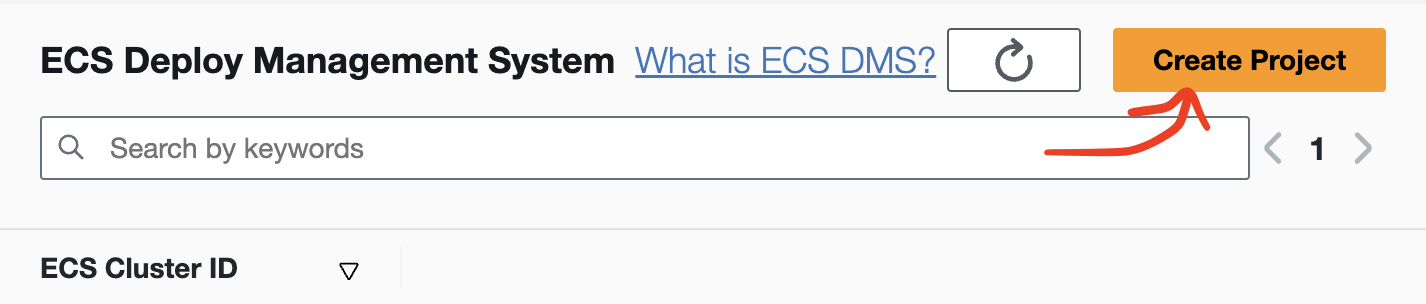
- click the
Create Projectbutton.
Step 1. Deploying the Spring Boot server on ECS Cluster, simultaneously create a new ALB (example, payment Spring Boot server).
- I'll set the prefix for your application. In the example provided, the prefix is defined as
/api/payment/*. Following that, a controller is configured to handle requests at the/api/payment/healthpath, allowing for server health checks.
package com.example.demo;

import org.springframework.stereotype.Controller;
import org.springframework.web.bind.annotation.GetMapping;
import org.springframework.web.bind.annotation.RequestMapping;
import org.springframework.web.bind.annotation.ResponseBody;

@Controller
@RequestMapping("/api/payment")
public class TestController {

    @GetMapping(value = "/health")
    @ResponseBody
    public String healthCheckPage () {
        return "OK";
    }

    @GetMapping(value = "/do")
    @ResponseBody
    public String order () {
        return "Payment SUCCESS";
    }

    @GetMapping(value = "/payment/cancel")
    @ResponseBody
    public String cancelPayment () {
        return "Payment Canceled";
    }
}
- Please proceed with the steps in the order indicated in the image below.
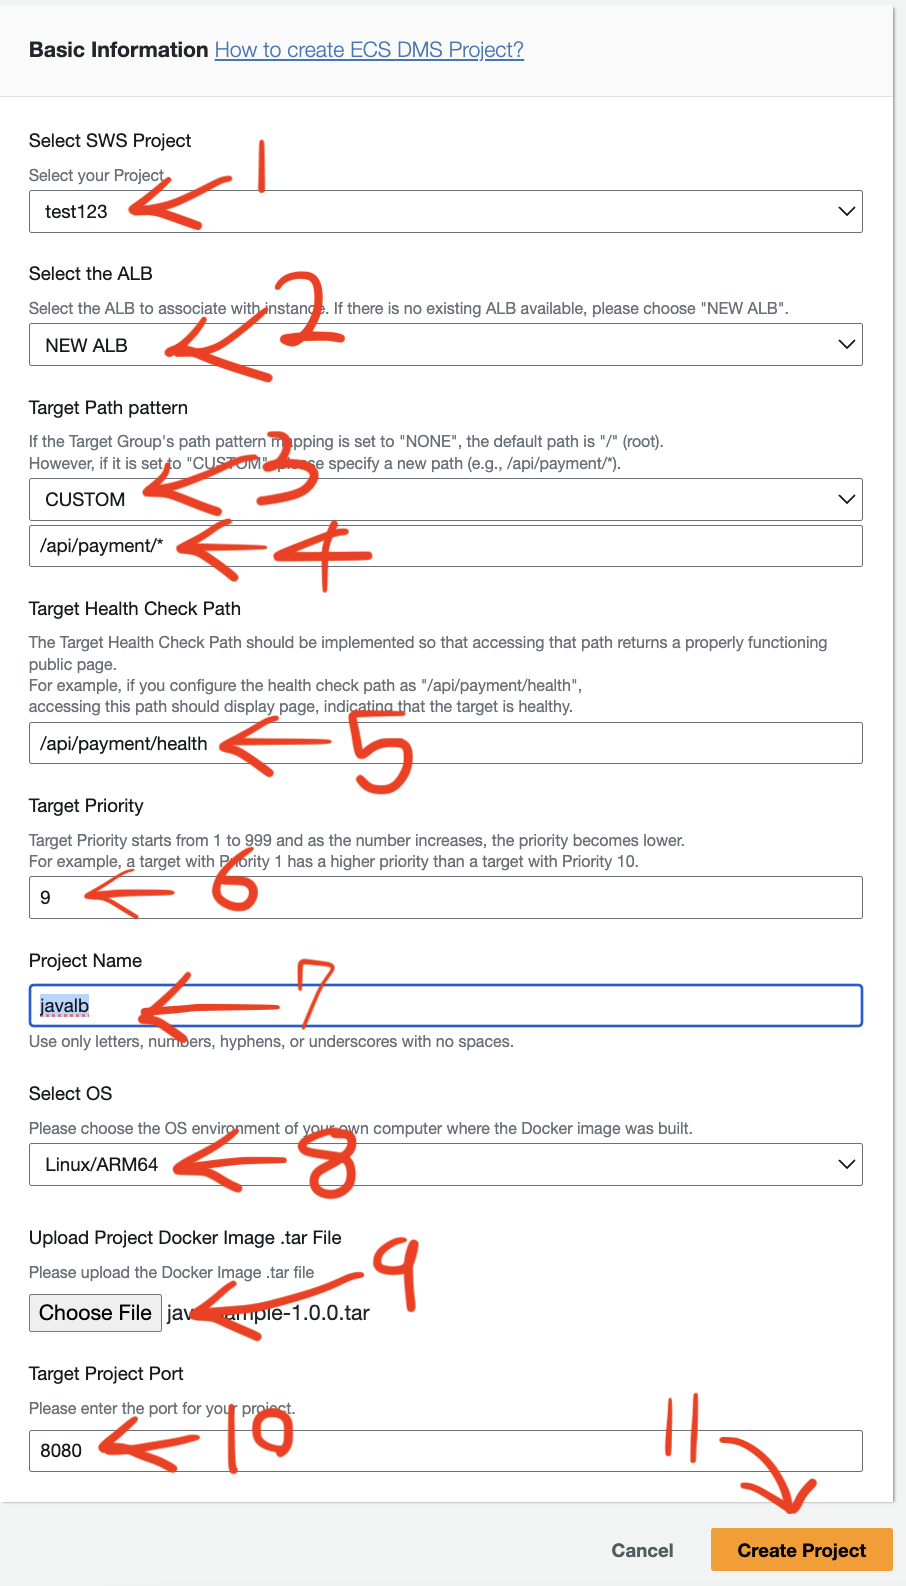
(1) Select the SWS Project.
(2) The Select the ALB option allows you to choose whether to deploy the project to ECS Cluster by creating a new Application Load Balancer (ALB) and connecting it or by connecting to an existing ALB. If you want to deploy to a new ALB, select NEW ALB.
(3) Select CUSTOM for the Target Path pattern.
(4) Enter the prefix /api/payment/* as indicated in the code example above.
(5) Enter the health check path /api/payment/health as specified in the code example above.
(6) Set the target priority to a value between 1 and 999.
(7) Enter the Project Name.
(8) Select the OS and architecture environment of your own computer where the Docker image was built. You can use the following command to check the OS and architecture of a Docker image.
docker inspect --format='{{.Os}} {{.Architecture}}' Docker_Image_Name
(9) Please use the following command to create the Docker image as a .tar file and then press the Choose File button to upload the file.
- create the Docker image as a
.tar file, Please replaceDocker_Image_Namewith the name of your Docker image.
docker save -o ./Docker_Image_name.tar Docker_Image_Name:latest
(10) Enter the port of the project to be deployed in the Target Project Port.
(11) Click the Create Project button.
Step 2. Connect the Express.js server as a new service to the ECS cluster created above and deploy it to the existing ALB (example, logging Express.js server).
- I'll set the prefix for your application. In the example provided, the prefix is defined as
/api/logging/*. Following that, a controller is configured to handle requests at the/api/logging/healthpath, allowing for server health checks.
var express = require('express');
var router = express.Router();

/* GET home page. */
router.get('/api/logging/health', function(req, res, next) {
  res.render('index', { title: 'Express' });
});
router.get('/api/logging/insert', function(req, res, next) {
  res.render('', { title: 'SUCCESS' });
});

module.exports = router;
- Please proceed with the steps in the order indicated in the image below.
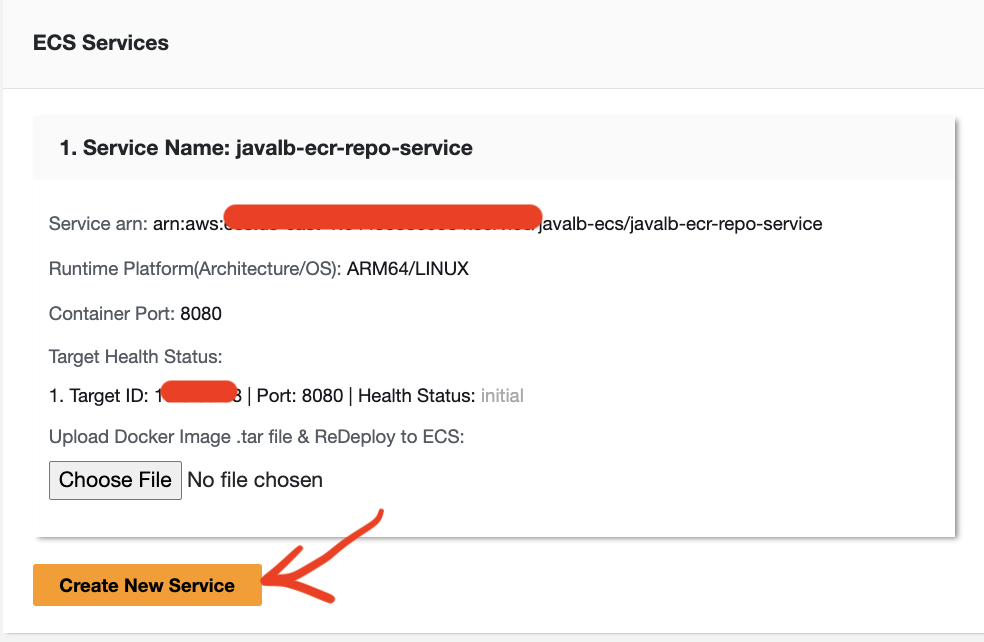
(1) Please click on the ECS Cluster ID created in step 1.

(2) Scroll down to the ECS Services section and click on the Create New Service button.
(3) When the Create New Service modal appears, please proceed with the following steps in numerical order:
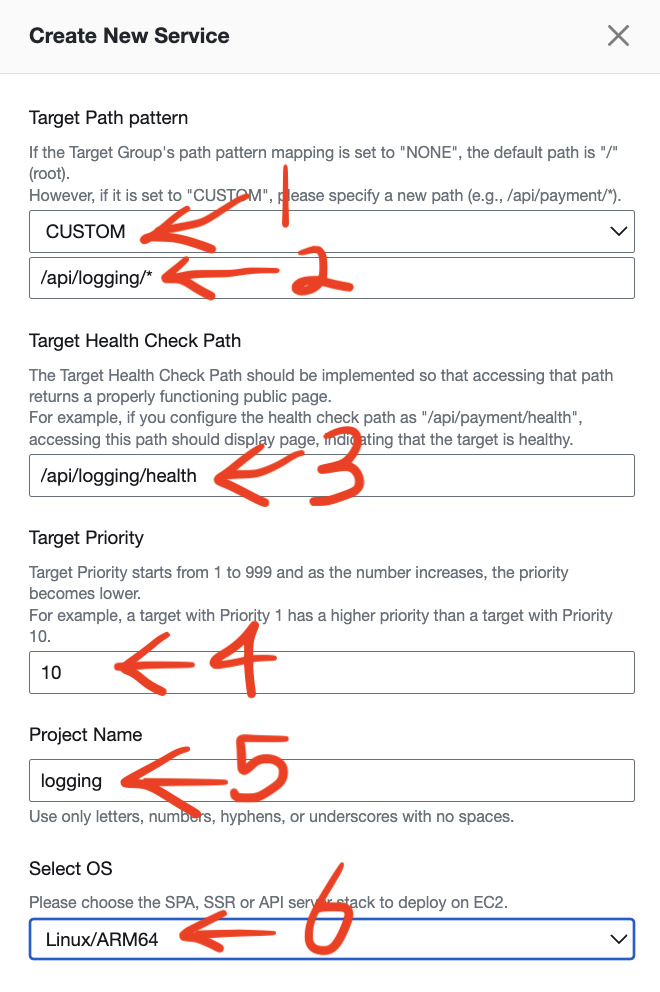
Select
CUSTOMfor the Target Path pattern.Enter the prefix
/api/logging/*as indicated in the code example above.Enter the health check path
/api/logging/healthas specified in the code example above.Set the target priority to a value between 1 and 999.
Enter the
Project Name.Select the
OSandarchitectureenvironment of your own computer where the Docker image was built. You can use the following command to check the OS and architecture of a Docker image.docker inspect --format='{{.Os}} {{.Architecture}}' Docker_Image_NamePlease use the following command to create the Docker image as a
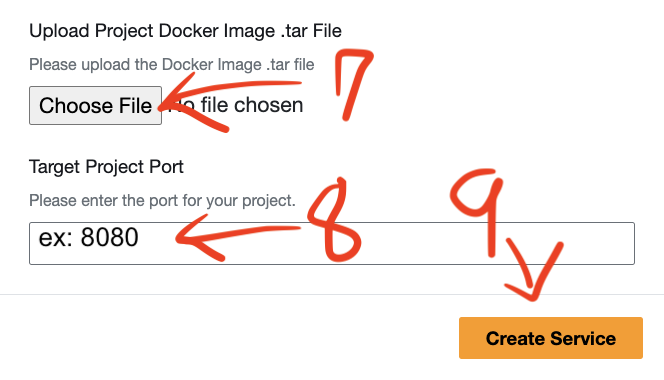
.tar fileand then press theChoose Filebutton to upload the file.
create the Docker image as a
.tar file, Please replaceDocker_Image_Namewith the name of your Docker image.docker save -o ./Docker_Image_name.tar Docker_Image_Name:latest
- Enter the port of the project to be deployed in the
Target Project Port.
- Click the
Create Projectbutton.
Step 3. Proceed similarly to Step 1, connecting to the ALB of the project created in Step 1 to deploy the Spring Boot server (e.g., Spring Boot product server).
- example code
package com.example.demo;

import org.springframework.stereotype.Controller;
import org.springframework.web.bind.annotation.GetMapping;
import org.springframework.web.bind.annotation.RequestMapping;
import org.springframework.web.bind.annotation.ResponseBody;

@Controller
@RequestMapping("/api/product")
public class TestController {

    @GetMapping(value = "/health")
    @ResponseBody
    public String healthCheckPage () {
        return "health";
    }

    @GetMapping(value = "/order")
    @ResponseBody
    public String order () {
        return "Order SUCCESS";
    }

    @GetMapping(value = "/order/cancel")
    @ResponseBody
    public String cancelPayment () {
        return "Order Canceled";
    }
}
- Please proceed with the steps in the order indicated in the image below.
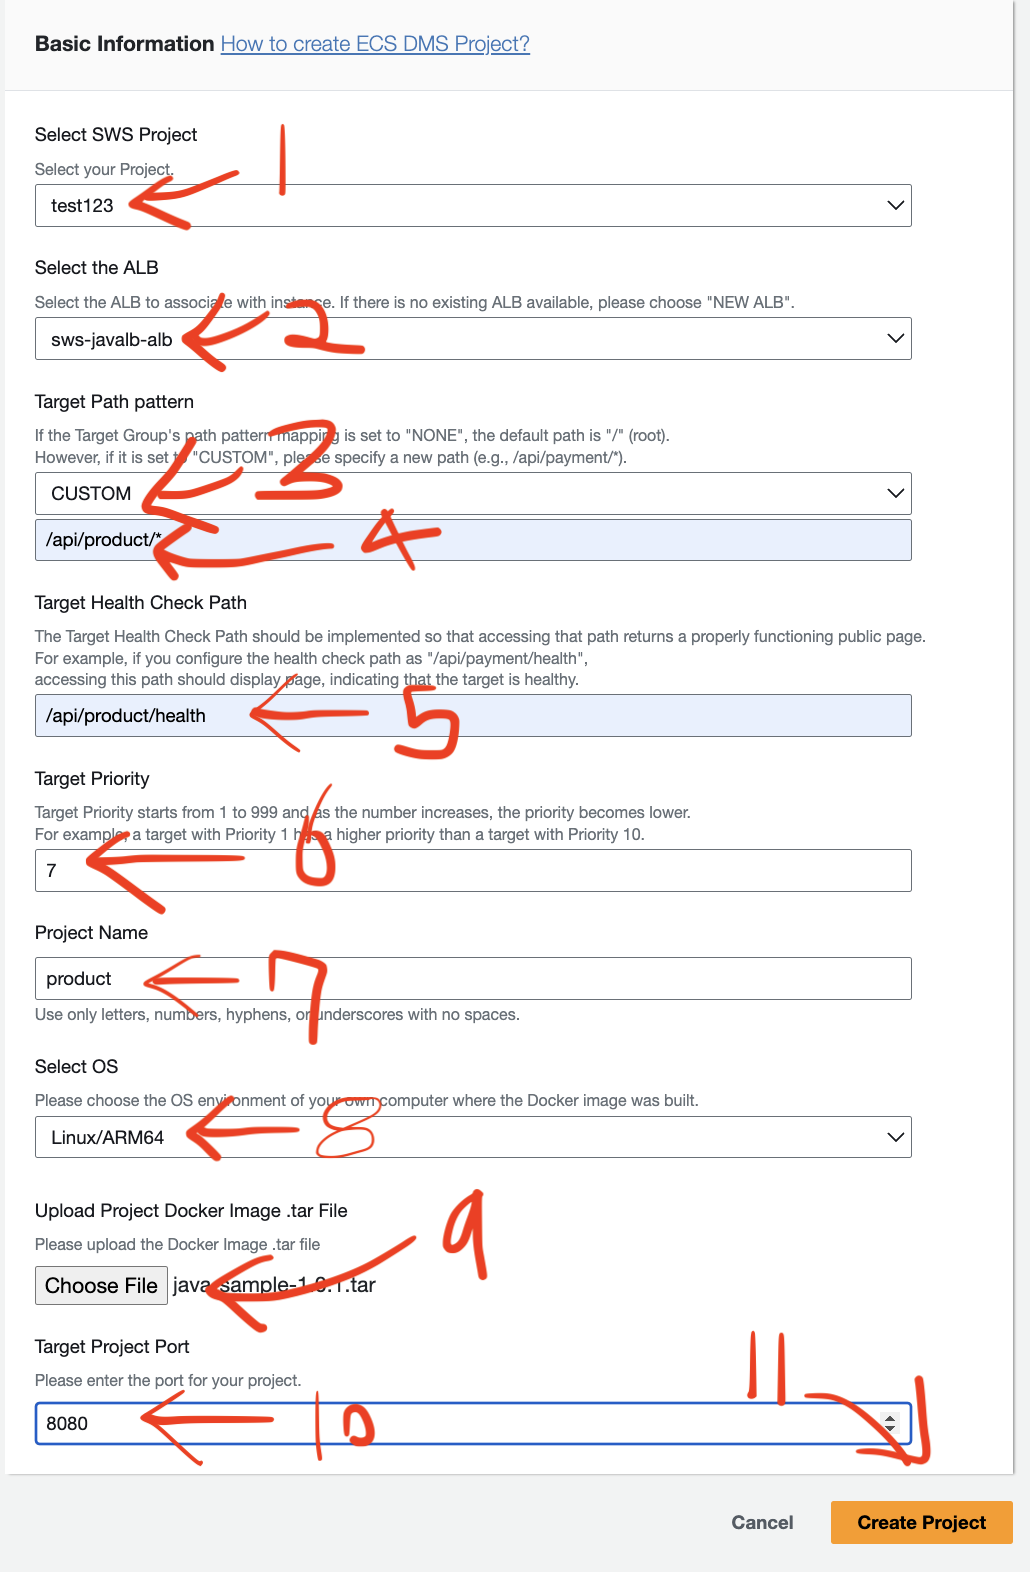
(1) Select the SWS Project.
(2) The Select ALB option connects the project to an existing ALB and deploys it to the ECS cluster. In the example above, it selects an ALB with the name javalb created in Step 1 to connect to the cluster.
(3) Select CUSTOM for the Target Path pattern.
(4) Enter the prefix /api/payment/* as indicated in the code example above.
(5) Enter the health check path /api/payment/health as specified in the code example above.
(6) Set the target priority to a value between 1 and 999.
(7) Enter the Project Name.
(8) Select the OS and architecture environment of your own computer where the Docker image was built. You can use the following command to check the OS and architecture of a Docker image.
docker inspect --format='{{.Os}} {{.Architecture}}' Docker_Image_Name
(9) Please use the following command to create the Docker image as a .tar file and then press the Choose File button to upload the file.
- create the Docker image as a
.tar file, Please replaceDocker_Image_Namewith the name of your Docker image.
docker save -o ./Docker_Image_name.tar Docker_Image_Name:latest
(10) Enter the port of the project to be deployed in the Target Project Port.
(11) Click the Create Project button.